


Temank 120Vac 40A Hybrid PWM/MPPT Inverter/Charge solar charge controller With LCD Display Overview:
This is a multi-functional inverter/charger, combining the functions of inverter, PWM/MPPT solar charger and battery charger to offer uninterruptible power support with portability. Its comprehensive LCD display offers user-configurable and easy-accessible button operation such as battery charging current, priority setting for AC/solar charger, and acceptable input voltage setting to suit different applications
Features
- Brand: Temank
- Model: POW-3KP-24S-PAR
- Technology: Hybrid MPPT/PWM
- Display Model: LCD Display
- Built-in PWM/MPPT solar charge controller
- Configurable input voltage range for home appliances and personal computers via LCD setting
- Configurable battery charging current to suit different applications via LCD setting
- Configurable priority of AC/Solar Charger via LCD setting
- Compatible to mains voltage or generator power
- Automatic restart while AC is recovering
- Overload/ Over temperature/ short circuit protection
- Smart battery charger design to optimize battery performance
- Cold start function
Specifications:
Table 1: Line Mode Specifications

Table 2: Inverter Mode Specifications

Table 3: Charging Mode Specifications

Table 4 General Specifications

Basic System Architecture
The following illustration shows basic application of this inverter/charger. It also includes the following devices to complete the whole running system:
- Generator or Utility.
- PV modules
Consult your system integrator for other possible system architectures depending on your requirements.
This inverter can power all kinds of appliances at home or in the office, including motor-type appliances such as tube light, fan, refrigerator and air conditioner.

Product Overview
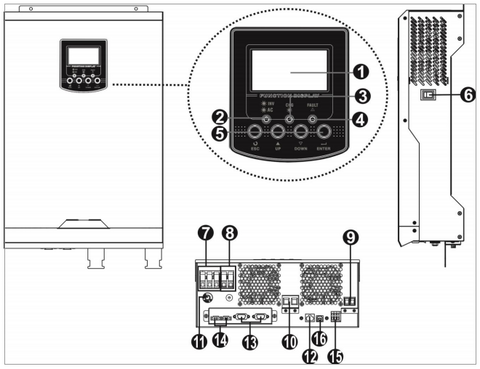
- LCD display
- Status indicator
- Charging indicator
- Fault indicator
- Function buttons
- Power on/off switch
- AC input
- AC output
- PV input
- Battery input
- Circuit breaker
- RS232 communication port
- Parallel communication port (only for parallel model)
- Current sharing port (only for parallel model)
- Dry contact
- USB communication port
INSTALLATION
Unpacking and Inspection
Before installation, please inspect the unit. Be sure that nothing inside the package is damaged. You should have received the following items inside the package:
- The unit x 1
- User manual x 1
- Communication cable x 1
- Software CD x 1
Preparation
Before connecting all wirings, please take off the cover of the bottom by removing the two screws as shown below.


Mounting the Unit
Consider the following points before selecting where to install:
- Do not mount the inverter on any flammable construction materials.
- Mount this inverter on a solid surface
- Install this inverter at eye level in order to read the LCD display at all times.
- The ambient temperature should be between 0°C and 55°C to ensure optimal operation.
- The inverter should be adhered to the wall vertically. Be sure to keep other objects away and leave the space in a minimum as shown in the right diagram to guarantee sufficient heat dissipation and enough space for replacing wires.
NOTES: SUITABLE FOR MOUNTING ON CONCRETE OR OTHER NON-COMBUSTIBLE SURFACE ONLY.
Install the unit by screwing two screws as shown in the diagram. It’s recommended to use M4 or M5 screws.
Battery Connection
CAUTION: For safety operation and regulation compliance, it’s requested to install a separate DC over-current protector or disconnect the device between battery and inverter. It may not be necessary to disconnect the device for some applications, however, it’s requested to have over-current protection installed. Please refer to the typical amperage in the table below as required fuse or size of the breaker.
WARNING! All wiring must be performed by a qualified personnel.
WARNING! It's very important for system safety and efficient operation to use appropriate cable for battery connection. To reduce risk of injury, please use proper cables and suitable size of terminal recommended below.
Recommended battery cables and size of terminal:

Please follow the steps below to implement the battery connection:
- Remove insulation sleeve 18 mm for positive and negative conductors.
- Suggest to put bootlace ferrules on the end of positive and negative wires with a proper crimping tool.
- Fix strain relief plate to the inverter by supplied screws as shown in below chart.

Connect all battery packs as below chart.

Insert the battery wires flatly into battery connectors of inverter and make sure the bolts are tightened with torque of 2 Nm in clockwise direction. Make sure polarity at both the battery and the inverter/charge is correctly connected and conductors are tightly screwed into the battery terminals. Recommended tool: #2 Pozi Screwdriver

To firmly secure wire connection, you may fix the wires to strain relief with cable tie.

AC Input/Output Connection
CAUTION!! Before connecting to AC input power source, please install a separate AC breaker between inverter and AC input power source. This will ensure the inverter can be securely disconnected during maintenance and fully protected from over current of AC input. The recommended spec of AC breaker is 40A for 3KVA.
CAUTION!! There are two terminal blocks with “IN” and “OUT” markings. Please do NOT mis-connect input and output connectors.
WARNING! All wiring must be performed by the qualified personnel.
WARNING! It's very important for system safety and efficient operation to use appropriate cable for AC input connection. To reduce risk of injury, please use the recommended cable size as below.
Suggested cable requirement for AC wires

Please follow below steps to implement AC input/output connection:
- Before making AC input/output connection, be sure to open DC protector or disconnector first.
- Remove insulation sleeve 10mm from the six conductors. And short-circuit phase L and neutral conductor N 3 mm.
- Insert AC input wires according to polarities indicated on terminal block and tighten the terminal screws. Be sure to connect PE protective conductor first.

Then, insert AC output wires according to polarities indicated on terminal block and fasten the terminal screws. Be sure to connect PE protective conductor first.

Make sure the wires are securely connected.
PV Connection
CAUTION: Before connecting to PV modules, please install separately a DC circuit breaker betwand PV modules.
WARNING! All wiring must be performed by a qualified personnel.WARNING! It's very important for system safety and efficient operation to use appropriate module connection. To reduce risk of injury, please use the recommended cable size as below.

PV Module Selection:
When selecting proper PV modules, please be sure to consider the parameters below:
- Open circuit Voltage (Voc) of PV modules can’t exceed the maximum voltage of the PV array open circuit of the inverter.
- Open circuit Voltage (Voc) of PV modules should be higher than the minimum voltage of the battery.

Please follow the steps below to implement PV module connection:
- Remove insulation sleeve 10 mm from positive and negative conductors.
- Check the correct polarity of connected cable from PV modules and PV input connectors. Then, connect positive pole (+) of connection cable to positive pole (+) of PV input connector. Connect negative pole (-) of connection cable to negative pole (-) of PV input connector.
- Make sure the wires are securely connected.

Final Assembly
After connecting all wirings, please put the bottom cover back by fixing two screws as shown below.

There is detail information about Temank 120Vac 40A Hybrid PWM/MPPT Inverter/Charge solar charge controller With LCD Display as below: